파이썬에서 "enumerate" 함수는 반복 가능한 객체를 인자로 받아서 해당 객체의 요소들을 순회하면서, 각 요소의 인덱스와 값을 순서쌍으로 반환한다.
이러한 기능을 통해 코드 작성의 편의성과 가독성을 높일 수 있다.
enumerate(iterable, start=0)
iterable: 반복 가능한(iterable) 객체, 예를 들면 리스트(list), 튜플(tuple), 문자열(str), 딕셔너리(dictionary) 등이 있다.
start: 인덱스의 시작값을 설정합니다. 기본값은 0이다.
예제
다음과 같은 리스트가 있다.
fruits = ['apple', 'banana', 'cherry']
이 리스트를 "enumerate" 함수에 전달하면, 다음과 같은 enumerate 객체가 반환된다.
enumerate_fruits = enumerate(fruits)
이제 이 객체를 for 루프로 반복하면, 인덱스와 해당 요소값을 순서대로 출력할 수 있다.
for index, fruit in enumerate_fruits:
    print(index, fruit)
위의 코드를 실행하면 다음과 같은 결과가 출력다.
0 apple
1 banana
2 cherry
enumerate와 for 루프
"enumerate" 함수는 주로 for 루프와 함께 사용된다.
for 루프는 반복 가능한(iterable) 객체를 순회하면서, 각 요소를 처리하는데, 이 때 "enumerate" 함수를 사용하면 인덱스 정보를 함께 처리할 수 있기 때문에 유용하다.
for index, fruit in enumerate(fruits):
    print(f"Index {index}: {fruit}")
위 코드는 fruits 리스트의 요소를 순회하면서, 각 요소의 인덱스와 값을 출력한다.
결론
"enumerate" 함수는 파이썬에서 매우 유용한 내장 함수 중 하나이다.
이 함수는 반복 가능한(iterable) 객체를 인자로 받아서 해당 객체의 요소들을 순회하면서, 각 요소의 인덱스와 값을 순서쌍으로 반환한다. 이러한 기능을 통해 코드 작성의 편의성과 가독성을 높일 수 있다. "enumerate" 함수는 for 루프와 함께 사용되며, for 루프를 사용할 때 인덱스 정보를 함께 처리할 때 유용하다. 이 함수를 사용하면 코드 작성이 더욱 간결해지고 가독성이 좋아진다.
엑세스, 리프레시 토큰은 쉽게 탈취당하지 않도록 http only 속성으로 쿠키에 저장을 해주었기 때문에, js 브라우저에서나 타인이 쉽게 볼 수 없고 탈취가 어렵다.
HTTP Only란? - document.cookie와 같은 자바스크립트로 쿠키를 조회하는 것을 막는 옵션 - 브라우저에서 HTTP Only가 설정된 쿠키를 조회할 수 없다. - 서버로 HTTP Request 요청을 보낼때만 쿠키를 전송한다. - 이를 통해 XSS(Cross Site Scripting) 공격을 차단할 수 있다.
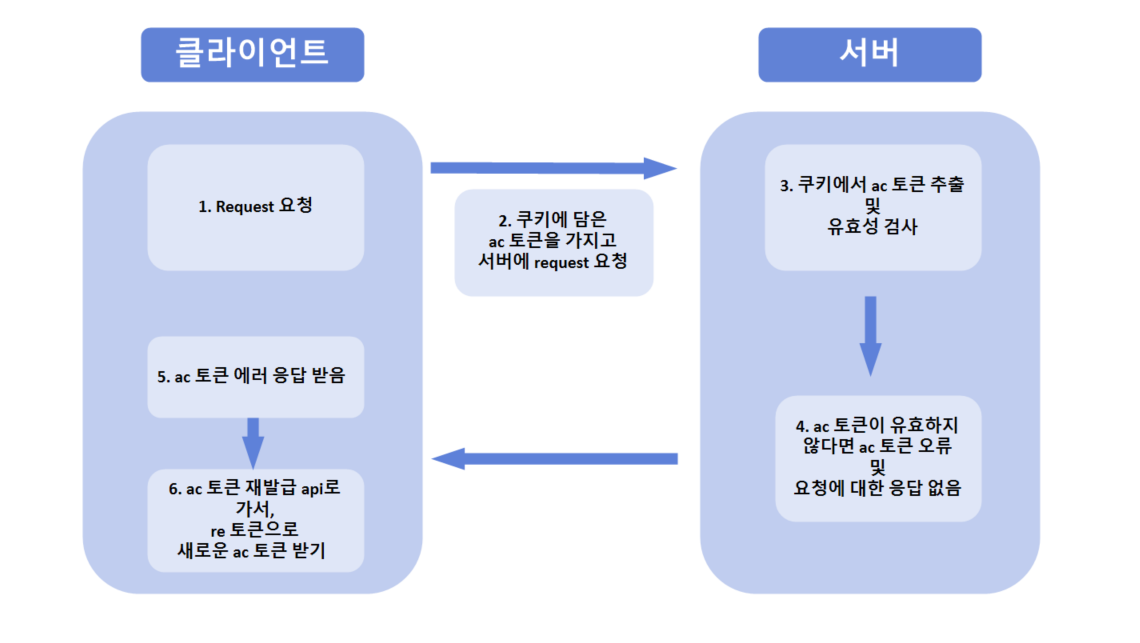
b. 로그인 후 요청
상황 1 : 로그인 후 요청 보낼 때 (엑세스 토큰이 유효한 경우)
1.1 ac 토큰이 유효하다면 인증/ 인가가 성공하여 응답을 반환한다.
1.2 요청했던 작업을 정상 수행한다.
상황 2 : 로그인 후 요청 보낼 때 (엑세스 토큰이 유효하지 않은 경우)
1.1 ac 토큰 에러 응답을 보낸다
1.2 이때 아래의 과정을 통해 엑세스 토큰 재발급 api로 이동해서 새로운 엑세스 토큰을 발급받아야 한다.
상황 2 -1 : 엑세스 토큰을 리프레시 토큰을 통해 재발급 과정
1-1. 서버는 클라이언트가 액세스 재발급 해주세요 라는 api를 발동시키게 되면, 쿠키에 저장돼있는 refreshToken을 잡아와서 이 refreshToken이 유효한 지 검사한다. 1-2 유효하다면 액세스를 재발급해준다. 1-3 액세스 재발급 api는 Authorization에 Bearer 방식으로 리프레쉬 토큰을 담아서 요청을 보내면 서버에서는 리프레쉬토큰 기간 만료 여부, 유효 여부를 따진다. 1-4 refreshToken기간이 만료됐다면, refreshToken 재발급이 필요하다는 에러를 throw 해야 한다. 1-5 이때 refreshToken이 유효하지 않아서 재발급 해야한다는 말은 사용자를 강제로그아웃 시킨 뒤, 재로그인하도록 만들어야 한다는 것과 똑같다.
어떻게 활용?
그럼 위의 로직을 바탕으로 프로젝트를 구성한다면 CSR 방식과 SSR 방식이 있을 것이다.
일단, 1. CSR 방식
이 방식은 클라이언트와 서버가 분리된 환경에서 api 통신으로 엑세스 토큰은 로컬스토리지, 헤더에 담고 리프레시 토큰은 쿠키에 담아서 보내면 된다.
2. SSR 방식
이 방식에서는 보통 jwt 방식을 잘 사용하지 않는다고 한다. 그래도 구현을 할 수는 있는데, 엑세스 토큰과 리프레시 토큰을 클라이언트 쿠키에 담아주는 방식이다.
근데 일단 이 방식에서는 폼에서 탬플릿엔진(jsp, 타임리프 등)을 사용해서 보여주기 때문에 따로 자바스크립트 코드를 사용해서 쿠키에 담는 방식을 이용해야 한다.
또한 jwt가 stateless 한 특징을 갖고 있는데 SSR 방식에서는 stateless 한 특성이 잘 보이지 않는다.
그래서 SSR 방식에서 jwt 를 사용한다면 왜 사용했는지, 그 이유를 명확히 말할 수 있어야 한다.
일단 나는 SSR 방식에서 jwt 토큰을 발급했기 때문에.. 코드는 아래와 같다.
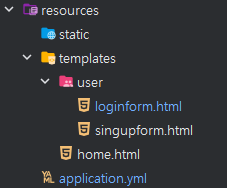
2. Login form
<!DOCTYPE html>
<html lang="ko" xmlns:th="http://www.thymeleaf.org">
<head>
    <meta charset="UTF-8">
    <title>로그인</title>
    <script src="https://cdn.jsdelivr.net/npm/axios/dist/axios.min.js"></script>
    <script src="/static/js/auth.js"></script> // 리프레시 토큰으로 엑세스 토큰 재발급
</head>
<body>
<form id="loginForm" action="/api/login" method="post">
    <input type="text" id="username" name="username" placeholder="아이디" required />
    <input type="password" id="password" name="password" placeholder="비밀번호" required />
    <button type="button" onclick="loginUser()">로그인</button>
</form>

<script>
    function loginUser() {
        var username = document.getElementById('username').value;
        var password = document.getElementById('password').value;

        var data = {
            username: username,
            password: password
        };

        axios.post('/api/login', data)
            .then(response => {
                // 로그인 성공 시 토큰을 쿠키에 저장
                var accessToken = response.data.accessToken;
                var refreshToken = response.data.refreshToken;

                document.cookie = "accessToken=" + accessToken + "; HttpOnly; path=/";
                document.cookie = "refreshToken=" + refreshToken + "; HttpOnly; path=/";

                // 성공 시 다음 페이지로 이동 혹은 필요한 작업 수행
                window.location.href = '/api/users/home';
            })
            .catch(error => {
                console.error('로그인 에러:', error);
                // 실패 시 에러 처리 혹은 사용자에게 알림
                alert('로그인 실패. 다시 시도해주세요.');
            });
    }
</script>
</body>
</html>
나는 SSR 방식으로 프로젝트를 진행 중이기 때문에 폼에서 axios, fetch 등으로 쿠키를 클라이언트에 보내주는 작업을 했어야 한다.
그래서 위의 폼에서의 자바스크립트 코드를 보면 엑세스, 리프레시 토큰을 앤드포인트에서 받아와 클라이언트 쿠키에 넣어주는 역할을 하고 있다.
참고로 위의 코드에서는 단순히 로그인 시에 엑세스와 리프레시 토큰을 받아오는 코드만 있고 엑세스 토큰이 만료되면 리프레시 토큰으로 재발하는 과정은 없다.
아래에 있는 코드가 재발급 과정에 맞는 코드이다.
아래 코드는 모든 요청마다 쿠키를 검증하는데, 이때 쿠키에 엑세스 토큰의 요청이 만료되면 리프레시 토큰의 유무를 판단하여 엑세스 토큰을 재발급하던지, 로그아웃을 하는 방향으로 진행된다.
// Axios 인터셉터를 설정하여 요청 전에 Access Token의 유효성을 검사하고 만료 시 갱신
axios.interceptors.request.use(
    async config => {
        // 쿠키에서 accessToken을 읽어온다.
        var token = getCookie('accessToken');
        if (token) {
            config.headers['Authorization'] = 'Bearer ' + token;
        }

        try {
            // Access Token이 만료되었는지 확인하는 로직 추가
            var exp = parseJwt(token).exp;
            var now = Date.now() / 1000;

            if (exp < now) {
                // Access Token이 만료되었으므로 Refresh Token을 사용해 갱신
                var refreshToken = getCookie('refreshToken');
                if (refreshToken) {
                    const response = await axios.post('/api/refreshToken', null, {
                        headers: {
                            'Authorization': 'Bearer ' + refreshToken
                        }
                    });
                    var newAccessToken = response.data.accessToken;

                    // 새로 발급받은 Access Token을 요청 헤더에 포함
                    config.headers['Authorization'] = 'Bearer ' + newAccessToken;
                } else {
                    throw new Error('리프레시 토큰이 존재하지 않습니다.');
                }
            }
        } catch (error) {
            console.error('토큰 갱신 오류:', error);
        }
        return config;
    },
    error => {
        return Promise.reject(error);
    }
);

// 쿠키에서 값 읽기
function getCookie(name) {
    let cookieArr = document.cookie.split(";");
    for (let i = 0; i < cookieArr.length; i++) {
        let cookiePair = cookieArr[i].split("=");
        if (name == cookiePair[0].trim()) {
            return decodeURIComponent(cookiePair[1]);
        }
    }
    return null;
}

// JWT 파싱
function parseJwt(token) {
    try {
        return JSON.parse(atob(token.split('.')[1]));
    } catch (e) {
        return null;
    }
}
나처럼 백엔드와 프론트엔드가 분리된 환경이 아니라면 jwt 토큰을 사용하는 것에 있어서 깊은 생각을 해봐야 할 것이다. !
@Entity
@Table(name = "todos")
@Getter @Setter @ToString
@NoArgsConstructor
public class Todo {
    @Id @GeneratedValue(strategy = GenerationType.IDENTITY)
    private Long id;

    private String todo;

    private boolean done;

    public Todo(String todo) {
        this.todo = todo;
    }
}
Repository
@Repository
public interface TodoRepository extends JpaRepository<Todo, Long> {
}
Service
@Service
@RequiredArgsConstructor
public class TodoService {
    private final TodoRepository todoRepository;

    @Transactional(readOnly = true)
    public List<Todo> getTodos() {
        return todoRepository.findAll(Sort.by("id").descending());
    }

    @Transactional(readOnly = true)
    public Todo getTodo(Long id) {
        return todoRepository.findById(id).orElse(null);
    }

    @Transactional
    public Todo addTodo(String todo) {
        return todoRepository.save(new Todo(todo));
    }

    @Transactional
    public Todo updateTodo(Long id) {
        Todo todo = null;
        try{
            todo = todoRepository.findById(id).orElseThrow();
            todo.setDone(!todo.isDone());
        }catch (Exception e){
            e.printStackTrace();
        }
        return todo;
    }

    @Transactional
    public Todo updateTodo(Todo todo) {
        Todo updatedTodo = null;
        try{
            updatedTodo = todoRepository.save(todo);
        }catch (Exception e){
            e.printStackTrace();
        }
        return updatedTodo;
    }

    @Transactional
    public void deleteTodo(Long id) {
        todoRepository.deleteById(id);
    }
}
Controller
@RestController
@RequestMapping("/api/todos")
@RequiredArgsConstructor
public class TodoController {
    private final TodoService todoService;

    @GetMapping
    public List<Todo> getTodos(){
        return todoService.getTodos();
    }
    @GetMapping("/{id}")
    public Todo getTodo(@PathVariable("id") Long id){
        return todoService.getTodo(id);
    }
    @PostMapping
    public Todo addTodo(@RequestBody Todo todo){
        return todoService.addTodo(todo.getTodo());
    }

    // put: 객체 자체가 바뀔 때
    // patch: 객체의 일부분만 수정될 때
    @PatchMapping("/{id}")
    public Todo updateTodoById(@PathVariable("id") Long id){
        return todoService.updateTodo(id);
    }

    @PatchMapping
    public Todo updateTodo(@RequestBody Todo todo){
        return todoService.updateTodo(todo.getId());
    }

    @DeleteMapping
    public String deleteTodo(@RequestBody Todo todo){
        todoService.deleteTodo(todo.getId());
        return "ok";
    }
}
3. IntelliJ에서 http 사용방법
IntelliJ IDEA에서는 HTTP 클라이언트 기능을 내장하고 있어서 .http 파일을 사용하여 직접 HTTP 요청을 보내고 결과를 받을 수 있다.
.http 파일 작성 방법
파일 생성: IntelliJ에서 새 파일을 생성하고 파일 확장자를 http로 설정한다.
요청 작성
각 요청은 요청 메소드, URL, 필요한 경우 헤더와 바디를 포함해서 HTTP 요청을 작성한다.
여러 요청을 한 파일 내에 작성할 수 있고, 요청 사이에는 ###을 사용하여 구분한다.
http 예제
todo.http
### GET /todos
GET <http://localhost/api/todos>
Accept: application/json

### GET /todos/{id}
GET <http://localhost/api/todos/3>
Accept: application/json

### POST /todos
POST <http://localhost/api/todos>
Content-Type: application/json

{
  "todo": "New Todo Item"
}

### PATCH /todos/{id}
PATCH <http://localhost/api/todos/2>
Accept: application/json

### PATCH /todos
PATCH <http://localhost/api/todos>
Content-Type: application/json

{
  "id": 2,
  "todo" : "Update Todo"
}

### DELETE /todos
DELETE <http://localhost/api/todos>
Content-Type: application/json

{
  "id": 2
}
JWT 공부를 시작했을 때 JWT를 왜 사용하는지를 한동안 고민에 잠겼고 결론에 대해서 정리하고 싶어서 작성하게 되었다.
JWT의 STATELESS 상태에 대한 집착
@Configuration
@EnableWebSecurity
@RequiredArgsConstructor
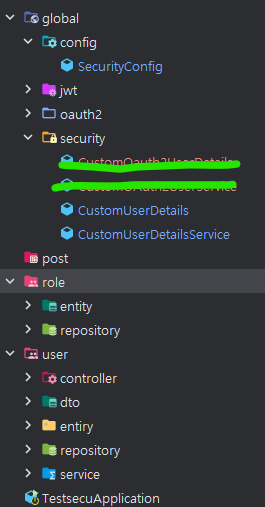
public class SecurityConfig {
private final CustomUserDetailsService customUserDetailsService; // 기본 세션 로그인
private final CustomOauth2UserService customOAuth2UserService; // OAuth2 등록
// AuthenticationManager가 인자로 받을 AuthenticationConfiguraion 객체 생성자 주입
private final AuthenticationConfiguration authenticationConfiguration;
private final JWTUtil jwtUtil; //JWTUtil 주입
// AuthenticationManager Bean 등록
// AuthenticationConfiguration 인자를 또 받기 때문에 주입
@Bean
public AuthenticationManager authenticationManager(AuthenticationConfiguration configuration) throws Exception {
return configuration.getAuthenticationManager();
}
@Bean
public SecurityFilterChain securityFilterChain(HttpSecurity http) throws Exception {
http
.authorizeRequests(authorize -> authorize
.requestMatchers("/login", "/", "/join").permitAll()
.requestMatchers("/admin").hasAuthority("ADMIN")
.anyRequest().authenticated()
)
.formLogin(form -> form.disable())
.httpBasic(auth -> auth.disable())
.sessionManagement(session -> session // jwt 방식에서는 session --> STATELESS
.sessionCreationPolicy(SessionCreationPolicy.STATELESS))
.userDetailsService(customUserDetailsService)
.csrf(csrf -> csrf.disable())
// --> 우리는 formLogin 을 disable 해놨기 때문에 UsernamePasswordAuthenticationFilter 을 직접 커스텀 해야한다.
.addFilterBefore(new JWTFilter(jwtUtil), LoginFilter.class)
.addFilterAt(new LoginFilter(authenticationManager(authenticationConfiguration), jwtUtil), UsernamePasswordAuthenticationFilter.class)
.cors(httpSecurityCorsConfigurer -> httpSecurityCorsConfigurer.configurationSource(configurationSource())
);
return http.build();
}
@Bean
public PasswordEncoder passwordEncoder(){
return new BCryptPasswordEncoder();
}
@Bean
public CorsConfigurationSource configurationSource(){
UrlBasedCorsConfigurationSource source = new UrlBasedCorsConfigurationSource();
CorsConfiguration config = new CorsConfiguration();
config.addAllowedOrigin("*");
config.addAllowedHeader("*");
config.addAllowedMethod("*");
config.setAllowedMethods(List.of("GET","POST","DELETE"));
source.registerCorsConfiguration("/**",config);
return source;
}
}
위의 시큐리티 JWT config를 구성한 코드를 보면
SessionCreationPolicy.STATELESS 상태가 등장하는 것을 볼 수 있다.
그래서 나는 이 STATELESS 상태에 초점이 맞추어 생각을 했다. --> JWT 구현을 위해 STATELESS 상태가 필요하지만 STATELESS에 초점을 잡고 생각을 하니 문제가 많아졌다. --> 아래를 읽다보면 왜 문제인지 알 수 잇을 것이다.
문제 상황
일단 기본적으로 JWT를 사용하면 토큰 탈취의 문제로 기존 Access 토큰과 함께 Refresh 토큰의 도입을 이야기한다.
따라서 Refresh, Access라는 2가지의 토큰을 발급해주는데, Refresh 토큰 요청는 Access 토큰 만료보다 주기 자체가 길기 때문에 탈취 당할 확률은 낮다고는 하지만 어찌되었든 탈취 당할 수 있다.
그래서 이 탈취 당할 확률을 방지하기 위해 서버측에서 어떠한 방법을 구현해야 하는데 이 부분에 대해서 많은 고민을 했다.
레디스, 데이터베이스의 도입
만약, 토큰이 탈취 되었을때 서버의 제어권과 로그아웃 문제 등 을 생각해보자.
일단 토큰이 탈취되면 토큰의 만료 기간 까지 서버측은 고통을 받을 것이다.
따라서 아예 서버를 꺼버리거나 서버 비밀키를 변경하는 상황까지 가는 불상사가 발생할 것이다.
혹은 프론트 서버측 로그아웃을 구현할 수도 있는데 이때 이미 해커가 토큰을 복제 했다면 해커는 그 토큰을 가지고 계속 서버에 접속할 수 있기 때문에 여전히 문제가 있다.
그래서 서버측에서 이러한 문제에 대해서 구현해줘야 하는데 이를 위해 서버측 Redis와 같은 저장소에 발급한 Refresh 토큰을 저장해서 로그아웃을 하거나 토큰이 탈취 당했을 때 블랙리스트를 도입하여 블랙리스트에 저장한다는 구현들이 많았다.
그래서 로그아웃 상태거나 탈취된 토큰은 Redis 서버에서 제거하여 앞으로 Access 토큰 재발급이 불가능하도록 설정하는 것이었다.
하지만 모순...
위처럼 서버에서 레디스같은 저장소를 도입하는 것을 이야기 했지만 나는 그것은 모순이라고 생각했다.
Refresh들을 저장하기 위한 Redis를 도입해버리면 사실상 세션 클러스터링을 작업하고 세션 방식을 사용하는 것이 좋지 않을까? 라는 생각을 하게 된 것이다.
왜냐면 나는 jwt config 를 작성하면서 앞 단에서 세션 STATELESS 작업을 했는데, 뒷단인 다른 곳에서 상태 저장이 생겨버리는 것이 아닌가 라는 생각이 든 것이다.
그래서 탈취를 막으면서도 Redis를 도입하지 않을 방법에 대해서 고민을 했지만.....
시원한 해답은 얻지를 못했다. 아래처럼 계속 둘레에 빠져 한 곳만 바로보고 있던 것이다. STATELESS → 그런데 Redis → 그럼 차라리 세션 → 왜 JWT를 사용했지?
결론 : JWT를 왜 사용하는가?
우리는 우리가 할려는 일에 대해서 목표가 무엇인지 판단해야 한다. 우리가 JWT의 목적을 확인하지 않고 구현에만 열중한다면 무엇을 하는지도 모르는 것에 불과하다. 따라서 JWT의 STATELESS한 상태에만 목적을 두는 것이 아닌 JWT가 왜 필요한지를 생각했고 해답을 찾았다.
JWT를 사용한 이유
모바일 앱
JWT가 사용된 주 이유는 결국 모바일 앱의 등장이다.
모바일 앱의 특성상 주로 JWT 방식으로 인증/인가를 진행한다.
그렇기 때문에 결국 세션 STATLESS는 앱의 등장으로 인해 부수적인 효과인 것이다.
장시간 로그인과 세션
장기간 동안 로그인 상태를 유지하려고 세션 설정을 하면 서버 측 부하가 많이 가기 때문에 JWT 방식을 이용하는 것도 한 방법이다.
위의 이런 이유때문에 jwt가 만들어졌고 JWT의 목적이 STATELESS가 아니기 때문에 나중에 로그아웃에 대해서 레디스나 디비에 리프레시 토큰을 저장하는 로직을 추가하는 것이 올바르다고 판단을 내렸다.
public class GoogleResponse implements OAuth2Response{

    private final Map<String, Object> attribute;

    public GoogleResponse(Map<String, Object> attribute) {
        this.attribute = attribute;
        System.out.println("google attributes: " + attribute);
    }

    @Override
    public String getProvider() {
        return "google";
    }

    @Override
    public String getProviderId() {
        return attribute.get("sub").toString();
    }

    @Override
    public String getEmail() {
        return attribute.get("email").toString();
    }

    @Override
    public String getName() {
        return attribute.get("name").toString();
    }
}
구글에 대해서는 카드 인증이 필요해서 귀찮기 때문에.. 하지는 않았지만 정리를 위해 작성했다. 실제 구글 oauth2는 신청하지 않았기에 사용하지 않았다.
3. OAuth2User
CustomOAuth2User.java
public class CustomOAuth2User implements OAuth2User {

    private final OAuth2Response oAuth2Response;
    private final String role;

    public CustomOAuth2User(OAuth2Response oAuth2Response, String role) {
        this.oAuth2Response = oAuth2Response;
        this.role = role;
    }

	// 현재는 null 했지만 이 값을 지정하면
    // 카카오,네이버 등 로그인했으면 거기에 맞는 프로필 사진이나 가져올 수 있음
    @Override
    public Map<String, Object> getAttributes() {
        return null;
    }

	// role에 해당하는 값
    @Override
    public Collection<? extends GrantedAuthority> getAuthorities() {
        Collection<GrantedAuthority> collection = new ArrayList<>();
        collection.add(new SimpleGrantedAuthority(role));
        return collection;
    }

    @Override
    public String getName() {
        return oAuth2Response.getName();
    }

	// 사용안함
    public String getUsername() {
        return oAuth2Response.getProvider()+" "+oAuth2Response.getProviderId();
    }
}
카카오, 네이버, 구글 서비스로부터 받은 특정 사이트의 응답 값과 롤에 대한 값을 받는 클래스이다.
이 클래스를 통해 특정 값과 롤에 대해 정의한다.
4. SecurityConfig
@Configuration
@EnableWebSecurity
@RequiredArgsConstructor
public class SecurityConfig {

    private final CustomUserDetailsService customUserDetailsService; // 기본 세션 로그인
    private final CustomOauth2UserService customOAuth2UserService; // OAuth2 등록

    @Bean
    public SecurityFilterChain securityFilterChain(HttpSecurity http) throws Exception {
        http
                .authorizeRequests(authorize -> authorize
                        .requestMatchers("/api/users/signup", "/api/users/login").permitAll()
                        .requestMatchers("/oauth-login/admin").hasRole("ADMIN")
                        .requestMatchers("/oauth-login/info").authenticated()
                        .anyRequest().authenticated()
                )
                .formLogin(form -> form
                        .loginPage("/api/users/login") // 로그인 페이지의 경로
                        .loginProcessingUrl("/login") // 로그인 폼이 제출되는 URL
                        .defaultSuccessUrl("/api/users/home")
                        .permitAll()
                )
                .logout(logout -> logout
                        .logoutUrl("/logout")
                        .logoutSuccessUrl("/")
                )
                .sessionManagement(sessionManagement -> sessionManagement
                        .maximumSessions(1)
                        .maxSessionsPreventsLogin(true)
                )
                .userDetailsService(customUserDetailsService)
                .csrf(csrf -> csrf.disable())
                .cors(httpSecurityCorsConfigurer -> httpSecurityCorsConfigurer.configurationSource(configurationSource()))
                // OAuth 등록
               .oauth2Login(oauth2 -> oauth2
                        .loginPage("/api/users/login") // 커스텀 로그인 방식 지정
                        // customOAuth2UserService 등록
                        .userInfoEndpoint(userInfoEndpointConfig ->
                                userInfoEndpointConfig.userService(customOAuth2UserService))
                        .failureUrl("/loginFailure")
                        .defaultSuccessUrl("/api/users/info")
                        .authorizationEndpoint(authorization -> authorization
                                .baseUri("/oauth2/authorization")
                        )
                        .permitAll()
                );
        return http.build();
    }

    @Bean
    public PasswordEncoder passwordEncoder(){
        return new BCryptPasswordEncoder();
    }

    public CorsConfigurationSource configurationSource(){
        UrlBasedCorsConfigurationSource source = new UrlBasedCorsConfigurationSource();
        CorsConfiguration config = new CorsConfiguration();
        config.addAllowedOrigin("*");
        config.addAllowedHeader("*");
        config.addAllowedMethod("*");
        config.setAllowedMethods(List.of("GET","POST","DELETE"));
        source.registerCorsConfiguration("/**",config);
        return source;
    }
}
Oauth2 설정을 해준다.
5. OAuth2UserService 구현
OAuth2UserService.java
@Service
@RequiredArgsConstructor
@Slf4j
public class CustomOauth2UserService extends DefaultOAuth2UserService {
    // DefaultOAuth2UserService는 OAuth2UserService의 구현체라서
    // DefaultOAuth2UserService 또는 OAuth2UserService 아무거나 상속해도 된다.

    private final UserRepository userRepository;
    private final RoleRepository roleRepository;

    // loadUser --> 네이버나 카카오의 사용자 인증 정보를 받아오는 메서드
    // userRequest 를 통해 카카오, 네이버, 구글 등등 인증 데이터가 넘어 올 것이다.
    @Override
    public OAuth2User loadUser(OAuth2UserRequest userRequest) throws OAuth2AuthenticationException {

        OAuth2User oAuth2User = super.loadUser(userRequest);

        System.out.println("OAuth2User attributes: " + oAuth2User.getAttributes());

        // 네이버, 구글, 깃허브 등등 어떤 어떤 인증 값인지 구별하기 위해 인증 제공자를 구분
        String registrationId = userRequest.getClientRegistration().getRegistrationId();

        // 각 사이트마다 인증 데이터 규격이 다르기 때문에 OAuth2Response 를 만들어 구별
        // 인증 제공자에 따라 OAuth2Response를 생성
        OAuth2Response oAuth2Response = null;

        // 그 값이 네이버면
        if (registrationId.equals("naver")) {
            log.info("naver 로그인");
            oAuth2Response = new NaverResponse(oAuth2User.getAttributes());
      	// 그 값이 카카오면
        } else if (registrationId.equals("kakao")) {
            log.info("kakao 로그인");
            oAuth2Response = new KakaoResponse(oAuth2User.getAttributes());
        // 둘다 아니면
        } else {
            System.out.println("로그인 실패");
            throw new IllegalArgumentException("지원하지 않는 로그인 제공자입니다.");
        }

        // 데이터 베이스 저장 관련 구현

        String provider = oAuth2Response.getProvider();
        String providerId = oAuth2Response.getProviderId();

        String username = provider + " " + providerId;
        Optional<User> userOptional = userRepository.findByUsername(username);

        String roleName = "USER";
        Optional<Role> roleOptional = roleRepository.findByName(roleName);
        Role role;
        if (roleOptional.isEmpty()) {
            role = new Role(roleName);
            role = roleRepository.save(role);  // Save the new role and get the persisted instance
        } else {
            role = roleOptional.get();
        }

        User user;
        if (userOptional.isEmpty()) {
            user = User.builder()
                    .username(username)
                    .email(oAuth2Response.getEmail())
                    .roles(Set.of(role))
                    .loginId(oAuth2Response.getProviderId())
                    .provider(oAuth2Response.getProvider())
                    .password("defaultPassword")
                    .registrationDate(LocalDateTime.now())
                    .usernick(oAuth2Response.getName())
                    .build();
            userRepository.save(user);
        } else {
            user = userOptional.get();
            user.setUsername(username);
            user.setEmail(oAuth2Response.getEmail());
            user.setLoginId(oAuth2Response.getProviderId());
            user.setProvider(oAuth2Response.getProvider());
            user.getRoles().add(role);
            user.setRegistrationDate(LocalDateTime.now());
            user.setUsernick(oAuth2Response.getName());
            userRepository.save(user);
            roleName = user.getRoles().iterator().next().getName();
        }

        System.out.println("User saved: " + user);

		// 특정 사이트의 응답 값과 역할을 받는 CustomOAuth2User 클래스
        // 인증된 사용자 정보를 반환
        return new CustomOAuth2User(oAuth2Response, roleName);
    }
}
Spring Security의 OAuth2 인증을 처리하는 커스텀 서비스이다.
주로 네이버, 카카오, 구글 등의 OAuth2 제공자에서 사용자 인증 정보를 받아와 데이터베이스에 저장하거나 업데이트하는 역할을 한다.
loadUser는 네이버나 카카오의 사용자 인증 정보를 받아오는 메서드이다.
외부 사이트로부터 사용자 정보를 받아오고 그 값을 디비에 저장하는 클래스이다.
6. 컨트롤러
UserController.java
@Controller
@RequiredArgsConstructor
@RequestMapping("/api/users")
@Slf4j
public class UserController {
    private final UserServiceImpl userServiceimpl;
    private final CustomUserDetailsService customUserDetailsService;

    @GetMapping("/signup")
    public String signup(Model model) {
        model.addAttribute("user", new UserDto());
        return "/user/singupform";
    }

    @PostMapping("/signup")
    public String signup(@ModelAttribute("user") UserDto userDto,
                         RedirectAttributes redirectAttributes) {
        try {
            userServiceimpl.signUp(userDto);
            redirectAttributes.addFlashAttribute("success", " 성공적으로 회원가입 됐습니다.");
            return "redirect:/api/users/login";
        } catch (Exception e) {
            log.error("회원가입 오류 : {} " , e.getMessage());
            redirectAttributes.addFlashAttribute("error", "회원가입에 실패했습니다." + e.getMessage());
            e.printStackTrace();
        }
        return "redirect:/api/users/login";
    }

    @GetMapping("/login")
    public String showLoginForm() {
        return "/user/loginform";
    }

    // 일반 로그인 회원의 정보 가져오기
    @GetMapping("/home")
    public String index(Model model, Authentication authentication) {

        String username = authentication.getName();
        Optional<User> userOptional = userServiceimpl.findByEmail(username);
        if (userOptional.isPresent()) {
            model.addAttribute("user", userOptional.get());
            return "user/home"; // user/home.html 템플릿으로 이동
        }
        return "redirect:/api/users/login";
    }

    // oauth2 유저의 정보 가져오기
    @GetMapping("/info")
    public String info(Model model, Authentication authentication) {
        CustomOAuth2User userDetails = (CustomOAuth2User) authentication.getPrincipal();

        model.addAttribute("name", userDetails);
        return "/user/info";
    }
}
원래의 나라면 Service는 Class로 만들었을 테지만, 팀원 중 한명이 유지보수에 좋다고 해서 분리해보겠다.
UserServiceImpl.java
@Service
@RequiredArgsConstructor
public class UserServiceImpl implements UserService {

    private final UserRepository userRepository;
    private final RoleRepository roleRepository;
    private final PasswordEncoder passwordEncoder;

    @Override
    @Transactional
    public void signUp(UserDto userDto) {
        if (!userDto.getPassword().equals(userDto.getPasswordCheck())) {
            throw new RuntimeException("비밀번호가 다릅니다.");
        }
        if (userRepository.existsByEmail(userDto.getEmail())) {
            throw new RuntimeException("이메일이 존재합니다.");
        }
        if (userRepository.existsByUsernick(userDto.getUsernick())) {
            throw new RuntimeException("닉네임이 존재합니다.");
        }

        Role role = roleRepository.findByName(userDto.getUsername().equals("admin") ? "ADMIN" : "USER");

        User user = new User();
        user.setRoles(Collections.singleton(role));
        user.setEmail(userDto.getEmail());
        user.setUsernick(userDto.getUsernick());
        user.setUsername(userDto.getUsername());
        user.setPassword(passwordEncoder.encode(userDto.getPassword()));

        userRepository.save(user);
    }

    @Override
    public Optional<User> findByEmail(String email) {
        return userRepository.findByEmail(email);
    }

    @Override
    public void deleteUser(String email) {
        Optional<User> emailOptional = userRepository.findByEmail(email);
        if (emailOptional.isPresent()) {
            userRepository.delete(emailOptional.get());
        } else {
            throw new RuntimeException("삭제할 사용자가 존재하지 않습니다.");
        }
    }
}
signUp 메서드를 보면 username이 admin이면 Role을 ADMIN으로 주고 그게 아니면 USER로 주는 것으로 진행했다.
5. 컨트롤러
Usercontroller.java
@Controller
@RequiredArgsConstructor
@RequestMapping("/api/users/")
@Slf4j
public class UserController {
    private final UserServiceImpl userServiceimpl;
    private final CustomUserDetailsService customUserDetailsService;

    @GetMapping("/signup")
    public String signup(Model model) {
        model.addAttribute("user", new UserDto());
        return "/user/singupform";
    }

    @PostMapping("/signup")
    public String signup(@ModelAttribute("user") UserDto userDto,
                         RedirectAttributes redirectAttributes) {
        try {
            userServiceimpl.signUp(userDto);
            redirectAttributes.addFlashAttribute("success", " 성공적으로 회원가입 됐습니다.");
            return "redirect:/users/login";
        } catch (Exception e) {
            log.error("회원가입 오류 : {} " , e.getMessage());
            redirectAttributes.addFlashAttribute("error", "회원가입에 실패했습니다." + e.getMessage());
            e.printStackTrace();
        }
        return "redirect:/api/users/login";
    }

    @GetMapping("/login")
    public String showLoginForm() {
        return "/user/loginform";
    }

//    @PostMapping("/login")
//    public void login(@ModelAttribute User user, RedirectAttributes redirectAttributes) {
//        try {
//            UserDetails userDetails = customUserDetailsService.loadUserByUsername(user.getUsername());
//            Authentication authentication = new UsernamePasswordAuthenticationToken(userDetails, user.getPassword(), userDetails.getAuthorities());
//            SecurityContextHolder.getContext().setAuthentication(authentication);
//        } catch (Exception e) {
//            redirectAttributes.addFlashAttribute("error", "아이디 또는 비밀번호가 올바르지 않습니다.");
//        }
//    }

    // 일반 로그인 회원의 정보 가져오기
    @GetMapping("/home")
    public String index(Model model, Authentication authentication) {

        String username = authentication.getName();
        Optional<User> userOptional = userServiceimpl.findByEmail(username);
        if (userOptional.isPresent()) {
            model.addAttribute("user", userOptional.get());
            return "user/home"; // user/home.html 템플릿으로 이동
        }
        return "redirect:/api/users/login";
    }
}
userDto로부터 회원가입에 필요한 정보를 받아서 회원가입을 한다.
여기서 애를 먹었는데, @Postmapping("/login")에서 로그인이 들어오면 그 정보를 가지고 있었는데 저부분 때문에 자꾸 로그인이 안됐다.
@Postmapping("/login") 메소드에서 CustomUserDetailsService를 통해 사용자를 로드하고 Authentication을 설정하려고 하지만, 이 방식은 Spring Security의 기본 인증 방식과 충돌할 수 있다.
Spring Security는 기본적으로 formLogin을 사용하여 로그인 처리를 자동으로 수행하므로, 수동으로 인증을 설정할 필요는 없다.
로그인 처리를 Spring Security의 기본 메커니즘에 맡기기 위해, UserController의 login 메소드를 제거하고, 로그인 페이지에서 제공한 폼 데이터를 Spring Security의 formLogin을 통해 처리하게 하는 것이 좋다.
6. UserDetails
CustomUserDetails.java
public class CustomUserDetails implements UserDetails {

    private final String email;
    private final String password;
    private final Collection<? extends GrantedAuthority> authorities;

    public CustomUserDetails(String email, String password, Set<Role> roles) {
        this.email = email;
        this.password = password;
        this.authorities = roles.stream()
                .map(role -> new SimpleGrantedAuthority(role.getName()))
                .collect(Collectors.toList());
    }

    @Override
    public Collection<? extends GrantedAuthority> getAuthorities() {
        return authorities;
    }

    @Override
    public String getPassword() {
        return password;
    }

    @Override
    public String getUsername() {
        return email;
    }

    @Override
    public boolean isAccountNonExpired() {
        return true;
    }

    @Override
    public boolean isAccountNonLocked() {
        return true;
    }

    @Override
    public boolean isCredentialsNonExpired() {
        return true;
    }

    @Override
    public boolean isEnabled() {
        return true;
    }
}
spring Security의 UserDetails 인터페이스를 상속하여 정의한다.
이 클래스가 하는 역할은 Spring Security는 이 클래스를 사용하여 사용자 인증 및 권한 부여를 처리한다.
일단 시큐리티를 사용하면 우리가 직접 로그인 처리를 안해도 된다.
POST /login 에 대한 요청을 security가 가로채서 로그인 진행해주기 때문에 우리가 직접 @PostMapping("/login") 을 만들지 않아도 됨!
토큰 방식이 아닌 기존 세션방식으로 시큐리티 로그인에 성공하면 Security Session을 생성해 준다.(Key값 : Security ContextHolder)
Security Session(Authentication(UserDetails)) 이런 식의 구조로 되어있는데 지금 작성한 CustomUserDetails에서 UserDetails를 설정해준다고 보면 된다.
7. UserDetailsService
CustomUserDetailsService.java
@Service
@RequiredArgsConstructor
@Slf4j
public class CustomUserDetailsService implements UserDetailsService {

    private final UserRepository userRepository;

    @Override
    public UserDetails loadUserByUsername(String username) throws UsernameNotFoundException {
        log.info("로그인이 들어왓나?");
        log.info("조회할 이메일: {}", username);
        Optional<User> userOptional = userRepository.findByEmail(username);
        if (userOptional.isEmpty()) {
            log.info("사용자가 없다");
            throw new UsernameNotFoundException("사용자가 존재하지 않습니다: " + username);
        }

        User foundUser = userOptional.get();
        Set<Role> roles = foundUser.getRoles();

        return new CustomUserDetails(
                foundUser.getEmail(),
                foundUser.getPassword(),
                roles
        );
    }
}
사용자가 로그인할 때, CustomUserDetailsService의 loadUserByUsername 메서드가 호출되어 사용자 정보를 데이터베이스에서 조회한다.
만약, 사용자가 존재하지 않는 경우 UsernameNotFoundException 예외를 발생시키고 사용자가 존재하는 경우, UserDetails 객체를 생성하고 반환한다.
Spring Security는 UserDetails 객체를 사용하여 사용자의 비밀번호와 권한 정보를 확인한다.
CustomUserDetails 객체는 사용자의 비밀번호와 권한 정보를 Spring Security에 제공한다.
Spring Security는 이 정보를 바탕으로 사용자가 인증되었는지 확인하고, 권한에 따라 접근을 제어한다.
즉, loadUserByUsername 메서드는 로그인을 진행할 때 주어진 사용자 이름(email, 로그인 진행 시 아이디)을 기반으로 사용자의 세부 정보를 검색하고 반환하는 역할을 한다.
jwt 방식을 사용한다면 이 방식은 필요없다.
7. SecurityConfig
SecurityConfig.java
@Configuration
@EnableWebSecurity
@RequiredArgsConstructor
public class SecurityConfig {

    private final CustomUserDetailsService customUserDetailsService;

    @Bean
    public SecurityFilterChain securityFilterChain(HttpSecurity http) throws Exception {
        http
                .authorizeRequests(authorize -> authorize
                        .requestMatchers("/api/users/signup", "/api/users/login", "/api/users/home").permitAll()
                        .anyRequest().authenticated()
                )
                .formLogin(form -> form
                        .loginPage("/api/users/login") // 로그인 페이지의 경로
                        .loginProcessingUrl("/login") // 로그인 폼이 제출되는 URL
//                        .usernameParameter("email") // 변경된 필드명
//                        .passwordParameter("password")
                        .defaultSuccessUrl("/api/users/home")
                        .permitAll()
                )
                .logout(logout -> logout
                        .logoutUrl("/logout")
                        .logoutSuccessUrl("/")
                )
                .sessionManagement(sessionManagement -> sessionManagement
                        .maximumSessions(1)
                        .maxSessionsPreventsLogin(true)
                )
                .userDetailsService(customUserDetailsService)
                .csrf(csrf -> csrf.disable());

        return http.build();
    }

    @Bean
    public PasswordEncoder passwordEncoder(){
        return new BCryptPasswordEncoder();
    }
}